Tuesday, August 24, 2010

butternut body progress

i glued up the body pieces last week, and started to shape it.


i've been stalled out trying to decide what to do next. cutting holes in the body to receive the neck requires getting the neck height figured out. neck height needs me to figure out the pegbox first, kinda. so maybe i'll drill the pilot holes for the pegs. even though this is 'trash' wood i still get hesitant, don't want to make a mistake!

here's the body resting where it will attach to the neck, just to get an idea of final product. that neck is seriously curved. the small piece to the left is the plum wood, shaping it into a peg.

Wednesday, August 18, 2010

Okinawan Eisa

i've been immersing myself in all things sanshin lately. here's a video of Okinawan ladies performing an eisa dance; sanshin and taiko! reminds me of the feeling i got when i first saw the SF taiko dojo in japantown. very very awesome.

Sunday, August 15, 2010

swedish cabinet scraper

today i learned how to use, and sharpen, a cabinet (or card) scraper. this is a fantastic tool! it can really get in and shave away wood where the plane can't reach.

overall it's been slow-going. i spend a lot of time thinking about what i want to do, planning. the wood is natural, not perfectly even, so a little difficult. the neck has a curve that i'll have to compensate for, maybe with the bridge placement. but the final product will be reflective of the life of the trees from which it comes. i like that.

here's the end of the neck (i think of it as the "dowel"), that will fit inside the body. i'm tapering and squaring it up, getting a ledge built where it will sit flush against the body. love that scraper.

Saturday, August 7, 2010

Sanshin - Pt. 1 (The Wood)

i'm going to make a small sanshin for mr. sha. sanshin is a three-stringed ("san"-"shin") instrument from okinawa, like a shamisen or banjo. traditionally it has snake skin for the head, but i don't think i'll be going that route. one never knows though, i'll tackle that part later.

vicki in smithfield offered to let me dig through her wood piles, from tree-trimmings etc., and also to look at her neighbors black walnut tree. i really should have gotten some pictures of the land out there with the trees, very lovely. the walnut tree died a couple of years ago, it is still standing and it's massive! i'll try to get pictures next time i'm out there. it makes me very happy to get this local wood, much more satisfying than to spend money on crap wood from lowe's or especially anything super expensive for proper luthier work.

here's what i came home with, from top to bottom; plum, walnut, butternut ("white walnut") x 2.


i scraped and chiseled off the bark, and hand sawed the limb nubs off. for the butternut, rick cut the limbs lengthwise with his tablesaw, to make boards. the plum was cracked, so i used a mallet and chisel to split it completely.

the walnut is very hard. it might do nicely as the neck/dowel. i chiseled and planed one side flat ("fret board" side, although this will be fretless). here is the neck and a closeup of the flat part, so far.


the butternut is so nice! the top plank isn't smoothed yet (you can see saw burns, and a ridge down the middle since the blade was not high enough to cut it in one pass). these will make the body. they make a very nice sound when struck together.


the plum i might use to make the pegs. it is very hard. not sure yet, but here's what it looks like.


Thursday, July 22, 2010

banjo-paint-can-lid-slide (made of junk)

this is a short summary of my first attempt at making an instrument, from last winter.

Neck: Red Oak (broken library chair)
Body: Paper mache
Pegs/Bridge/Tailpiece: Wood of unknown type
Nut: Pork Bone
Head: Paint can lid
Wood Finish: Tru-Oil gunstock finish
Strings: Leftover acoustic steel guitar strings


and a brief demonstration of its tonal qualities...

Saturday, July 17, 2010

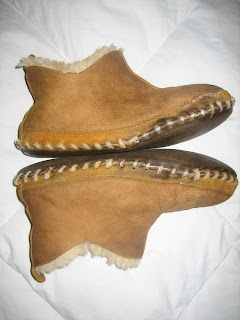
sheepskin slipper repair

i finally got around to cleaning and repairing my slippers.

here are the before shots, taken two months ago.


i read a little online about what not to do, then ignored the advice! i scrubbed them in the sink with liquid dish soap and cool water. it looked like some of the dye in the leather leached out in the rinse water, but they really needed the cleaning. i tried to focus the soap on the inside (fur), but the shoes were completely soaked in the end.

then i let them air dry outdoors (it's been in the 90's here, and mostly very dry). they took a couple of days to dry out. they didn't seem to shrink much, at least i can still fit them on my feet.

now to the repair. was trying to find good strong thin rope or something. i didn't want to spend money to buy anything special. betty mentioned dental floss! i rejected that idea at first, but realized it is terribly strong and i could sew multiple layers to achieve the thickness i wanted in the seams.

and besides, i still have a ton of this stuff sitting in a box from the old J&J days:

here are the after shots. the fur is very nice and fluffy. the suede outside got a bit dry and tight from the detergent and drying, but it's starting to soften up just from handling it to do the seam repair. the dentotape i used was waxed, which worked great because each stitch adhered nicely after i pulled it tight, avoiding stitch slipping.

i wear these things constantly in winter (outside in rain and snow, in the garage to do woodworking, in the kitchen to cook) and they take quite a beating, so i'm glad they will have some life left.


Wednesday, July 7, 2010

garden update

5 weeks since the garden began, looks good!

the carpet of basil box got thinned to make spicy basil chicken.
eggplants and peppers (and tomatoes) all setting up.
mint!